Create and Register of a Custom Form in Oracle Applications(11i and R12)
Steps to
Create a new form in oracle Apps R12
2. Download all the necessary .FMb and .PLL files from the server
FMB- TEMPLATE.fmb and APPSTAND.fmb files
Server location FMB -$AU_TOP/forms/US
Server location PLL - $AU_TOP/resource (Try to download all PLL files)
First try to download below PLL files see if it works .If it does work then you don't need to download all the PLL files
APPCORE.pll APPCORE2.pll APPDAYPK.pll
APPFLDR.pll CUSTOM.pll FNDSQF.pll
FV.pll GHR.pll GLOBE.pll
GMS.pll HRKPI.pll IGILUTIL.pll
IGILUTIL2.pll JA.pll JE.pll
JL.pll OPM.pll PSA.pll
PQH_GEN.pll PSB.pll PSAC.pll
VERT.pll VERT1.pll VERT2.pll
VERT3.pll VERT4.pll VERT5.pll
3. Set Forms60_Path in Registry
Temporary folder and place all the PLL and FMB files.
Now go to
Start->Run->Regedit->HKEY_LOCAL_MACHINE->Software->Oracle
Here you can find the oracle home. In this home check for FORMS60_PATH; append the path of your folder
Where all the libraries and the form is present, prefixed with a semicolon (;)
OR
You can direct set the path using Forms Builder
Right Click on Forms Builder->properties->send menu (shortcut) ->Start in :-> you can put the path of folder where you place your all PLL and FMB files.
4. Always create a new form with TEMPLATE.fmb file.
Open the Forms Builder tool and connect it
Now open the TEMPLATE.fmb form from your local working directory
Remove Block “DETAILBLOCK”, Canvas "BLOCKNAME" Remove Window "BLOCKNAME" and
Create a new window, rename (Ex: TEST_WIN) and set property Function->primary canvas property to the newly created canvas.
Create a new canvas, rename (Ex: TEST_CAN) set property Physical->window property to the newly created window.
Create your blocks, items, triggers and relationships as per requirement.
Save your new FORM as with a different filename. Also rename the module with the same name as the filename.
Set the Form Module property
Function->Console window->Point to the newly created window.
First Navigation data block->Point to your Data Block.
Save your FORM frequently!!
5. Apply property classes to each item to ensure the same look like as the rest of Oracle Apps forms.
For each Module, Canvas, Window etc., apply the Property Classes that is most appropriate.
6. Changes need to be made in the Triggers and Program Units
Change the code in Pre-Form Trigger
app_window.set_window_position ('TEST_WIN', 'FIRST_WINDOW'); /*Data Block name */
Change the code in APP_CUSTOM Package Body
If (wnd = ‘<first window>’) then /* Window Name */
app_window.close_first_window;
SAVE YOUR WORK.
7. Open the FTP tool (like putty, filezilla, talnet, or connect the server using the CMD window)
Login to the tool and
Always move your form (.FMB) to the $AU_TOP/forms/US
Now compile the form using the below command
For Oracle Applications 11i
f60gen module=$AU_TOP/forms/US/FORM_NAME.fmb userid=apps/apps output_file==$CUSTOM_TOP/forms/US/FORM_NAME.fmx
module_type=form batch=yes compile_all=special
instead of CUSTOM_TOP you can use any of your application_top for output(.FMX) file.
For Oracle Applications R12
frmcmp_batch module=$AU_TOP/forms/US/FORM_NAME.fmb
userid=APPS/***** output_file=$CUSTOM_TOP/forms/US/FORM_NAME.fmx
module_type=form batch=yes compile_all=special
/*Use the same application_top at form registration time.
Press enter to execute the command, Now that Command creating (or replacing) the .fmx file into
Represented path.

8. Register the Custom Form into Oracle Application-
Go to the Application Developer Responsibility
If this responsibility is not there, then assign this responsibility to your username
Now go to Application ->Form

Register your Custom form here

Fields
Form: Enter the file name of your form (the name of the .fmx file) without extension.
Your form filename must be all uppercase, and its output file (.fmx) file must be located in your
application top.
Application : Enter the name of the application which will own this form.
User Form Name : This is the form_name you see when selecting a form using the
Functions window.
Description : Enter a suitable description for your form.
Register Form Functions
Navigation – Application Developer -> Application->Function
Give the Function name and user function name

Click on the form tab and you will see following screen
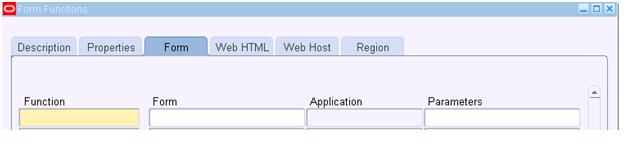
Fields
Function : Enter a unique function name for your function. This function name can be
Used while calling this program programmatically. This name is not visible to the user
Through other forms.
Form: Select the form name which you have registered.
Application: Select the application name for your form.
Parameters: Enter the parameters that you want to pass to your form function. E.g.
Query only.
Creating Menu of Functions
Navigation – Application Developer -> Application->Menu

Fields
Menu: Create new menu or if you want to attached your form for existing menu Query the menu _name. This name is not visible to the user.
User Menu Name: The user menu name is used when a responsibility calls a menu.
Menu Type: The options in menu type include:
• Standard – for menus that would be used in the Navigator form
• Tab – for menus used in self-service applications tabs
• Security – for menus that are used to aggregate functions for data security or
Specific function security purposes, but would not be used in the Navigator form
Seq : Enter a sequence number.
Prompt : Enter the prompt that the users will see for the menu.
Submenu: If you want another menu to be called from this menu, then enter this menu
Name in this field.
Function: Enter the form function name in this field.
Description: Enter a suitable description for the menu.
Grant: The Grant check box should usually be checked. Checking this box indicates that
This function is automatically enabled for the user. If this is not checked then the function
Must be enabled using additional data security rules.
One you will save the form you will get a note like

View Tree: Click on View Tree Button and you will see following screen with the full
Hierarchy of the menu.

Now go the Responsibility where your menu is attached and use your custom form!!!!
Comments
Post a Comment